Monday, July 11, 2011

CentOS 5.6 Thunderbird 5 working setup and install howto

UPDATE: Thunderbird 6.0 does not require the hack below!

If you are getting the error
thunderbird-bin: /usr/lib/libstdc++.so.6: version `GLIBCXX_3.4.9' not found (required by libxul.so)
You have come to one of the correct places. This is a continuation of the FIreFox 4 install. Again, I did not come up with this on my own! I just want to spread the word as much as possible that one very enlightened fellow referenced as "rkl" at forums.mozillazine.org has made it possible for the rest of us to hit the "easy button" and got FireFox 4.0 working on CentOS 5.x (CentOS 5.6 at this time). HERE is the original link that I lucked upon while trying to google it on my own.

This is my mostly plagiarized summary based on the original FF4 information for the link above. My testing was specifically done on CentOS 5.6 32bit desktop install:
1. Unpack the Thunderbird thunderbird-5.0.tar.bz2 somewhere (e.g. /opt/thunderbird5). A quick way to get the tar file is from the mozilla Thunderbird EN download link.

2. Download this 32-bit Fedora 9 libstdc++ RPM and unpack it with this command:

rpm2cpio libstdc++-4.3.0-8.i386.rpm | cpio -i --make-directories

3. Move the unpacked shared library into /opt/thunderbird5:

mv usr/lib/libstdc* /opt/thunderbird5/

Note: It's "usr/lib/libstdc*" above (i.e. the unpacked tree from the RPM, not the system /usr/lib tree) - do NOT put a leading slash there!

4. Run Thunderbird 5 with:

/opt/thunderbird5/thunderbird

I will say that TB5 is an *major* improvement from Thunderbird 3.x. So far there are less mailbox issues than with previous versions.

Friday, June 24, 2011

CentOS 5.x FireFox 5 working install

UPDATE: FireFox 6.0 does not require the hack below!

If you are getting the error
firefox-bin: /usr/lib/libstdc++.so.6: version `GLIBCXX_3.4.9' not found (required by /opt/firefox5/libxul.so)
You have come to one of the correct places. This is a continuation of the FIreFox 4 install. Again, I did not come up with this on my own! I just want to spread the word as much as possible that one very enlightened fellow referenced as "rkl" at forums.mozillazine.org has made it possible for the rest of us to hit the "easy button" and get FireFox 4.0 working on CentOS 5.x (CentOS 5.5 at this time). HERE is the original link that I lucked upon while trying to google it on my own.

This is my mostly plagiarized summary based on the original FF4 information for the link above. My testing was specifically done on CentOS 5.6 32bit desktop install:
1. Unpack the Firefox firefox-5.0.tar.bz2 somewhere (e.g. /opt/firefox5). A quick way to get the tar file is from the mozilla EN download link.

2. Download this 32-bit Fedora 9 libstdc++ RPM and unpack it with this command:

rpm2cpio libstdc++-4.3.0-8.i386.rpm | cpio -i --make-directories

3. Move the unpacked shared library into /opt/firefox5:

mv usr/lib/libstdc* /opt/firefox5/

Note: It's "usr/lib/libstdc*" above (i.e. the unpacked tree from the RPM, not the system /usr/lib tree) - do NOT put a leading slash there!

4. Run Firefox 5 with:

/opt/firefox5/firefox

rkl references the FireFox 4 beta version, but all steps still apply for official FireFox 5 release.

I will say that FF5 is an incremental improvement from FF4. My initial usage has been positive. There seems to be a "follow the rapid release cycle of Google's Chrome" mentality. I hope this will not make it more difficult for organizations to break from the IE "standard".

Thursday, June 23, 2011

novi merge utility for creating a fully updated install (base plus updates)

Novi is a very handy repository merging utility! The purpose of novi is to remove the problem of a system install followed by an immediate update in order to get a system fully patched and ready to go into service. Maybe this quote from the website makes it more clear:
novi is a tool for finding the latest-version RPMs in a tree. You can use it to create Kickstart trees or yum repos that contain the updated RPMS. In the case of Kickstart, this means machines come to life with the updates already applied. Using novi for yum repos trims the size of the repodata files, which reduces client download and processing time.
In reality, novi saves time and resources. This is especially true when dealing with the Fedora distribution.

For example, if an install takes 15 minutes and then the update takes 30 minutes depending how you update (local mirror I hope), you end up with about 45 minutes of time. With novi, that's just 15 minutes total time to get to the same place. Plus you have a much cleaner install without all of those pesky .rpmnew and .rpmsave files cluttering up the pristine new filesystem.

Naturally, I team novi with PXE boot and Kickstart files for the ultimate in lazy installs on systems. I will only focus on the novi portion as much as possible and leave the other pieces for another time.

The most basic setup requires a machine with enough drive capacity to handle the the base install files (however you want to get them) and all of the updates that you may want. I don't want EVERY update, so I tend to limit what I get by excluding packages I will NEVER install. Really, I don't need anyone install AlienArena on any system under my control, for example ;) Luckily, novi can hard link the merged repository and not just add to any space issue. You will also need that server to provide ftp or http services for the merged repository in order to install a client. Ethan McCallum was nice enough to VERY WELL explain most all of the entire concept, already.

My current multi-repository mirror is a CentOS 5.x server. This example is *very simple* Fedora 13 via ftp install. This could also be a http accessible area. As stated above, I do have a fair number of items to exclude via rsync. I took the extra step of rpmbuild'ing the latest CentOS 5 capable version, 1.1.9 from src.rpm. Sadly, most every repository I found only had the 1.1.5 version. CentOS 6 will be able to use the newer 2.1.11 version (when released).

#!/bin/bash BASE_DIR="/var/ftp/pub/yum/Fedora/linux/releases/13" EXCLUDES="$BASE_DIR/13.excludes" INCLUDES="--include-from=$BASE_DIR/13.includes" LOCAL_DIR="$BASE_DIR/updates/" MERGED="$BASE_DIR/merged/i386" ADMINEMAIL=admin@yoursite.com MIRROR_SITE="rsync://mirrors3.kernel.org/fedora/updates/13/i386" LOGFILE="/tmp/`basename $0`.out" cd $MERGED for DIR in $LOCAL_DIR $MERGED_DIR do if [ ! -d "$DIR" ] then mkdir -p "$DIR" fi done rsync -PvaH --bwlimit=300 --timeout=600 $INCLUDES --exclude-from=$EXCLUDES --numeric-ids --delete --delete-after --delay-updates --delete-excluded $MIRROR_SITE $LOCAL_DIR >& $LOGFILE EXIT="$?" if [ "$EXIT" -eq "0" ] then rm -f Packages/*.rpm novi -a hardlink -t $MERGED/Packages $BASE_DIR/os/i386/Packages $LOCAL_DIR/i386 createrepo -g repodata/fce31f091be8211a394d8942fcf4f6cbeffa3d40d87b61af55a97b1a88b46987-Fedora-13-comps.xml $PWD else cat $LOGFILE | "ERROR in $0 on `hostname -s` exit status of $EXIT" $ADMINEMAIL fi

As usual, comments are welcome and appreciated! Again, this is a basic chunk of code that should be better fleshed out by you. It also only includes the i386 branch and is easily extended.

(Note: I know F13 is EOL, but we have been utilizing novi for a long time)

Wednesday, June 15, 2011

Google Music Beta review with screensthots

Background:
You've got mail... Stupid movie name aside, I got an email invite to play with Google's Music service. I like toys and this is just another kinda toy. There is nothing revolutionary in concept with this music service in concept or execution. Music streaming and downloading have been around for a while to say the least. Google just makes it easier and more convenient. It should be obvious to state the requirement of a Google account in order to start using the Music service. So, on to the review:

I will start with the bad. The Music Manager upload utility is Windows and Mac only. No direct GNU/Linux support! I will end up trying wine soon. If wine succeeds, I'll report back. Otherwise, I will need to add the Music Manager to my otherwise pristine gaming rig or bring up some Windows VM in order to upload.

Update 6/15/2011!: There is a working modified MusicManager that will work with Wine 1.3.21 on Fedora 15. I *could* also get it to work with Wine 1.3.18 from rpmforge-testing under CentOS 5.6. I could not get Wine 1.3.7 under CentOS 5.6 to run MusicManager, however.

Another bad, in my opinion is missing, "show lyrics" option. This kind of option is kinda lame for *GOOGLE* not to have. Don't they have an index on EVERYTHING?! A simple link out to a lyrics site the same way they handle the shopping would even be a good start. But some in browser option would be better.

The web interface could use a range delete like the gmail webmail has. For example, if you add any "free" songs, you will be forced to individually remove each unwanted song. That is not a trivial task when you mistakenly added *several* groups of free music. In addition, "Recently added" should allow a date range or similar IMHO. I can't even figure out what recently means in this context.

Now for the good news for GNU/Linux peeps: Google Music will work without issue under at least the CentOS 5.6 or Fedora 13 and Fedora 15 distributions using either FireFox 4 and Google's Chrome 12 browsers. Adobe Flash of some version is required, I have tested with 10.2.x and 10.3.x. If you use any flash-blocking add-on make sure to white list google.com. The Flashblock 1.5.14.2 I have on Fedora 15 with FireFox 4.0.1did block the flash, but did not show me a notice that it was blocking.


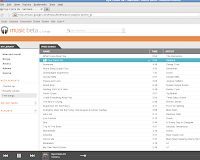
Browser controls are shown as simple player controls icons with shuffle and repeat options. In a normal Google fashion, there is not much fluff. Information presented on screen is basic, useful and utilitarian. This is a good thing in reality. If you think about, you should only visit the Google Music browser tab when you need to change something like a play list. It is very much a play and forget about browser tab.


Free songs are optionally provided you when activate your account. The songs I have come across are largely live versions of known songs. That's not completely the case, of course, but songs offered are worth the cost. Please keep in mind that you are limited to only 20,000 songs at this time.


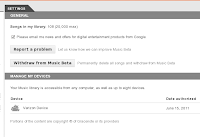
Google has provided some basic Settings changes for the web version of the service. To their credit, you can opt of Google Music with the click of a mouse. You will loose all of the uploaded music of course, but you can do it. The same Settings page also displays registered devices to your Music account. Not much to look at here so move along.


Missing from the options is any parental controls or music content rating. I believe this needs to be corrected soon. Google has provided a ranking system as simple thumbs up or down. This option could use some improvement. I would like to have seen something more like Netfix has with a global ranking and the option to put your own ranking. This would make finding and buying new good songs much easier.

Speaking of buying, you are 2 clicks from shopping for any selected song. Not surprisingly, you are taken to the Google Shopping link for lots of buying choices. The buying options seem to drift quickly away from the starting song selected. Maybe that's good, maybe that's bad... I'm leaning towards bad - just slightly.

It should be noted that Google is looking to cover their but if you look at the usage agreement you are required to accept. I understand why, of course. I also find it acceptable to be allowed to only have one active player at a time. Make sure to read the fine print.

Beyond the browser usage, I also tested with my DroidX with Android 2.2.1 and the Google Music version v3.0.1.339. Newer versions may be better or worse... these are currently beta pieces after all.


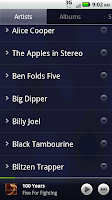
Once again, utilitarian is the operative word when speaking of the Music App for Android. It is simple in layout and has very little fluff. Cover art is not made prominent, for example. Player controls are obvious and basic. We all know what a play button looks like, right.


Thought has been put into some of the back-end options. Specifically the cache and wifi options. I am very glad to see both. Heck anyone with anything but a truly unlimited data plan should be happy to see them. As you would expect, the cache option from the Music -> Settings option allows you to cache (keep a local copy) of the music you are streaming so you won't have too again any time soon. The wifi option allows allows for the ability to mandate that either streaming or downloading of music is done through the wifi connection. Heck that great in many ways. My home internet connection is WAY faster than the 3G I have and doesn't cost me any more. Nice going Google.


The down side of utilitarian is the realization that you might be missing something. One of the some-things for me seems to be an on-screen volume control. Not critical by any stretch. After all, there is that up-down volume button on the side after all.


My overall belief is Google Music is a winner. With ease of use, flexible device connectivity and Google is behind it, many people will enjoy this service.

Thursday, June 2, 2011

My Tracks Android GPS route tracking app - mini review

I like to ride my road bike. I upgraded a year ago from a heavy 30lb mountain bike to a Fuji Roubaix Pro road bike off of craigslist. MUCH lighter at about 19lbs. I'm too lazy to actually chart my own road trip information. So, a quick google'n for a handy GPS app for my Droid X lead me to My Tracks. What a great find!

My Tracks reports itself as:
My Tracks records your GPS tracks and shows live statistics such as time, speed, distance, and elevation – while hiking, cycling, running or participating in other outdoor activities. Once recorded, you can share your tracks, upload them to Google Spreadsheets and visualize them on Google My Maps.

Here's a quick summary of the My Tracks Android app:
First, My Tracks is drop-dead easy to install. However, you expect ease of installation since basically all market place apps are easy to install.

My Tracks is very easy to just use. Start by enabling your GPS satellites on your phone. Not a big deal if you forget as My Tracks will remind you. That push-pin on the Google powered map is now your location. Want to see the satellite view of your current location, simply press Menu Key and toggle the Satellite/Map view option. Want to start a new GPS tracking session, just press Menu Key and Start Recording. Finished with the trip, well not surprisingly, press Menu Key and Stop Recording will stop collecting data.

The real beauty of My Tracks is what it will do after the collecting is done... the mapping and displaying and summarizing etc. My Tracks is geared toward google services - like it or not. I, personally, like it. Heck even the My Tracks web site is "Powered by Google App Engine". So, the visual gratification is to press the "+" icon on the screen and select to upload to Google and My Tracks will use your account to optionally create (Google) maps with the tracks or a (Google) fusion table to visualize your data points. Very cool overall!

Not into Google, no problem! My Tracks will allow you to export or email as  .gpx or .kml files. Heck, you can even tweet your ride. Check out the FAQ for more information on those features.

My only issue if you want to call it an issue is there is no delay option for starting. It does take me a several seconds to secure my Droid in it's pouch on the bike, get in on one pedal and start to ride. So, there, that's what could be improved ;)

On a side note, I am pleased to see that My Tracks source code is created with an Apache 2.0 License and is Open Source!

Note: Apps like "ShootMe" (Screen Grabber) seem to disable My Tracks ability to function for anything but time (as I learned the hard way).

Thursday, May 19, 2011

Dell printer warranty gathering information bash script for linux/unix

We have a LOT of different printer. A large number of them (over 60 and counting) are Dell branded printers. This includes laser printer models like the:
Dell Color Laser 3110cn
Dell Laser Printer 5210n
Dell Laser Printer M5200
Dell 5330dn Laser Printer
Dell Laser Printer 1720dn
Dell Laser Printer 5310n
Dell 2335dn MFP
Dell 2355dn Laser MFP
Dell 1815dn MFP
Dell 1600n MFP
Dell 3335dn MFP

I had a need to make sure to get all newer printers under warranty. Most of the units above have a web interface and most of the time the Service Tag is viewable from that interface. However, I'm very lazy even when it comes to clicking through all of the different types of printer web interfaces... then needing to go to Dell's support web site to manually check each Service Tag...

Naturally, I had to hack some shell script to do all of the dirty work for me. You will need snmpwalk, links, w3m and some added web fluff in the for of sortable columns and line highlighting via Sortable Table 2 java script. The script below will provide info on all printers found, just not warranty or Service Tag for non-Dell printers. The other good part is that you can tell from the "sysDescr.0" what firmware a printer is running also.

I don't remember why I have both links and w3m since this script was created a while back. I just thought it would be nice to post it now. Naturally, you could change out all of the html fluff and dump straight to csv for easy import into whatever you want.

If you have suggestions on code cleanup, I would love to see them. I think I have all the internal company specific stuff taken out and still usable. Enjoy. Sorry the formatting looks *UGLY*, but blogger freaks on the "span" greps in the code and this is the only way I have figured out how to show the code here. I need to verify that the stuff coming out of blogger is still working...

#!/bin/bash

WEBPINFO="/var/www/html/SOME/DIR/Printer_Info.html"
JSPATH="http://`hostname`/SOME/DIR"
PINFO="$WEBPINFO.`date +%y%m%d`"

cat > "$WEBPINFO" << EOF
<!DOCTYPE HTML PUBLIC "-//W3C//DTD HTML 4.01//EN" "http://www.w3.org/TR/html4/strict.dtd">
<html>
<head>
<title>Printer Warranty and firmware Information - sortable</title>
<META HTTP-EQUIV="Content-Type" CONTENT="text/html; charset=ISO-8859-1">
<script type="text/javascript" src="$JSPATH/sortedTable.js"></script>
<link type="text/css" href="$JSPATH/sortedTable.css" rel="stylesheet"/>
<link type="text/css" href="$JSPATH/nav.css" rel="stylesheet" />
<style>
        .red{color:crimson;}
        #nav{font-size:0.82em;}
</style>
</head>
<body>
<div class="tableWrapper">
<table id="table_1">
<thead>
<tr class="headerLine"><th class="sorttable_alpha">Hostname</th> <th class="sorttable_alpha">sysDescr.0</th> <th class="sorttable_mmdd">warranty expire</th> <th class="sorttable_alpha">Service Tag</th> <th class="sorttable_alpha">Printer name</th></tr>
</thead>
<tbody>
EOF

#get all network based print servers and exclude if needed
for PRINT_SERVER in `lpstat -t | egrep 'lpd://|socket://' |egrep -v 'SOME_PRINTER|SOME_OTHER_PRINTER'| cut -d"/" -f3 | cut -d":" -f1 | sort -u`
do
 unset SER ST PRTS http_proxy
 PRTS=`lpstat -t|grep $PRINT_SERVER[/:]|awk '{ print $3 }'|tr -s ':\n' ' '`
 ping -c 2 $PRINT_SERVER >& /dev/null
 if [ $? -eq 0 ]; then
   MOD=`snmpwalk -Os -c public -v 1 $PRINT_SERVER sysDescr.0  | cut -d":" -f2 `
   echo $MOD | grep -qi dell
   if [ "$?" -eq 0 ]; then
      #2335dn and JD24 and 1815dn are the same ST, but hrDeviceDescr.1 provides firmware version.
      if [ "`echo $MOD | egrep -qi '5330dn|2335dn|2355dn|JD24';echo $?`" -eq 0 ]; then
        ST="`links -dump http://$PRINT_SERVER/printer_info.htm|grep Service|tr -s ' '|cut -f6 -d ' '`"
      elif [ "`echo $MOD | egrep -qi '1815dn';echo $?`" -eq 0 ]; then
        MOD="$MOD `links -dump http://$PRINT_SERVER/printer_info.htm|grep 'Printer Firmware Version:'|cut -f2 -d ':'|tr -s ' '`"
        ST="`links -dump http://$PRINT_SERVER/printer_info.htm|grep Service|tr -s ' '|cut -f6 -d ' '`"
      elif [ "`echo $MOD | egrep -qi '3335dn';echo $?`" -eq 0 ]; then
        ST="`links -dump "http://$PRINT_SERVER/cgi-bin/dynamic/printer/config/reports/deviceinfo.html" |egrep 'Service'|tr -s ' '|cut -f6 -d ' '`"
      elif [ "`echo $MOD | egrep -qi '1720dn';echo $?`" -eq 0 ]; then
        ST="`links -dump "http://$PRINT_SERVER/cgi-bin/dynamic/information.html?path=/printer/info" |egrep 'Service'|tr -s ' '|cut -f6 -d ' '`"
      elif [ "`echo $MOD | egrep -qi '5210n|5310n';echo $?`" -eq 0 ]; then
        ST="`links  -dump "http://$PRINT_SERVER/cgi-bin/dynamic/config/reports/deviceinfo.html" |grep Service|tr -s ' '|cut -f6 -d ' '`"
      elif [ "`echo $MOD | egrep -qi 'M5200';echo $?`" -eq 0 ]; then
        ST="`links -dump http://$PRINT_SERVER/printer/info |egrep 'Service'|tr -s ' '|tr -d '|'|cut -f6 -d ' '`"
      elif [ "`echo $MOD | egrep -qi '3110cn';echo $?`" -eq 0 ]; then
        ST="`links -dump http://$PRINT_SERVER/ews/status/infomation.htm |egrep 'Service'|tr -s ' '|tr -d '|'|cut -f7 -d ' '`"
      fi
      #need a proxy? Squid is a great one!
      #export http_proxy=http://USERNAME:PASSWORD@PROXY_SERVER:PORT
      LINK="http://support.dell.com/support/topics/global.aspx/support/my_systems_info/details?c=us&l=en&s=pub&servicetag=$ST"
      SER="`w3m -no-cookie -dump "$LINK" |grep -A 6 Days|cut -c50-|grep "/"|awk '{ print $3 }'|sort |tail -1`"
    fi
    echo -e "<tr><td><a href="http://${PRINT_SERVER}">${PRINT_SERVER}</a></td> <td>${MOD}</td> <td>${SER}</td> <td><a href="$LINK">${ST}</a></td> <td>${PRTS}</td></tr>" >> $WEBPINFO
  else
   echo -e "<tr><td>${PRINT_SERVER}</td> <td>No Response</td> <td></td> <td></td> <td>${PRTS}</td></tr>" >> $WEBPINFO
 fi
done

cat >> "$WEBPINFO" << EOF
</tbody>
</table>

<p>
Total print servers = `lpstat -t | egrep 'lpd://|socket://' |egrep -v 'SOME_PRINTER|SOME_OTHER_PRINTER'| cut -d"/" -f3 | cut -d":" -f1 | sort -u|wc -l`
Created by $0 at `date` on `hostname`
<script>
        var config = {
                tableId:'table_1', // the only mandatory parameter
                rowOver:'row_over',
                sortMap:'1,2,3:desc'
        }
        var t2 = new Chth.sortTable();
        t2.init(config);
</script>
</body>
</html>
EOF

#keep a historical copy
cp -f $WEBPINFO $PINFO

Friday, May 6, 2011

Fedora 13 VMware Workstation 6.5.4 and 6.5.5 installation issue solved.

We do have the VMware Workstation 7.1 licensed, but I find that it *really* likes to crash on Fedora 13 a lot! So, tried to roll back to the 6.5.4 version I had downloaded from about a year ago and failed on module build. Here is the generally un-helpful error:
/tmp/vmware-root/modules/vmnet-only/vnetUserListener.c: In function ‘VNetUserListenerEventHandler’: /tmp/vmware-root/modules/vmnet-only/vnetUserListener.c:240: error: ‘TASK_INTERRUPTIBLE’ undeclared (first use in this function) /tmp/vmware-root/modules/vmnet-only/vnetUserListener.c:240: error: (Each undeclared identifier is reported only once /tmp/vmware-root/modules/vmnet-only/vnetUserListener.c:240: error: for each function it appears in.) /tmp/vmware-root/modules/vmnet-only/vnetUserListener.c: In function ‘VNetUserListenerRead’: /tmp/vmware-root/modules/vmnet-only/vnetUserListener.c:282: error: ‘TASK_INTERRUPTIBLE’ undeclared (first use in this function) /tmp/vmware-root/modules/vmnet-only/vnetUserListener.c:282: error: implicit declaration of function ‘signal_pending’ /tmp/vmware-root/modules/vmnet-only/vnetUserListener.c:282: error: implicit declaration of function ‘schedule’ make[2]: *** [/tmp/vmware-root/modules/vmnet-only/vnetUserListener.o] Error 1 make[1]: *** [_module_/tmp/vmware-root/modules/vmnet-only] Error 2 make[1]: Leaving directory `/usr/src/kernels/2.6.34.8-68.fc13.i686' make: *** [vmnet.ko] Error 2 make: Leaving directory `/tmp/vmware-root/modules/vmnet-only' Unable to install vmnet

First, make sure to have some basic pre-requisites before you start:
yum install gcc gcc-c++ kernel-headers kernel-devel

Modify accordingly if you are running the PAE kernel:
yum install gcc gcc-c++ kernel-headers kernel-PAE-devel

Next install (or update):
rpm -Uhv VMware-Workstation-6.5.5-328052.i386.rpm
You may need to terminate part of the build process.

The hard part was finding the magical google incantation to finally getting me to THIS VERY helpful link and the real solution of:
cd /tmp tar xf /usr/lib/vmware/modules/source/vmnet.tar -C /tmp tar xf /usr/lib/vmware/modules/source/vmci.tar -C /tmp perl -pi -e 's,("vnetInt.h"),\1\n#include "compat_sched.h",' vmnet-only/vnetUserListener.c perl -pi -e 's,("compat_page.h"),\1\n#include "compat_sched.h",' vmci-only/include/pgtbl.h tar cf /usr/lib/vmware/modules/source/vmnet.tar vmnet-only tar cf /usr/lib/vmware/modules/source/vmci.tar vmci-only

Finally run:
vmware-modconfig --console --install-all