Wednesday, October 19, 2011

CentOS 6.x Mythtv 0.24 plus Hauppauge PVR-500 setup hotwo

Let me start by stating that getting this setup to be functional was a frustrating experience. Mostly due to my lack of Mythtv setup experience. It's not to say that I have not been using Mythtv for a very long time. It's more along the lines that I run the boxes for sooooo long without issue and therefore don't have to deal with setup very often. The box I'm replacing was a venerable CentOS 5 setup with a single Hauppauge PVR-250. The other issue is that I introduced some new-to-me equipment (the PVR-500) and most found documentation did not directly pertain to the mythtv-0.24 version.

Basic CentOS 6.0 32bit is documented in a previous post. This will be more about the setup of the Hauppauge PVR-500 since that was really the only problem.

There is some some information in the Mythtv wiki that is helpful.

Please keep in mind that my main intent is to show the PVR-500 setup and not all
the easy other stuff.

Step 1: run mythtvsetup
Step 2: select "Capture cards" -> "New capture card"

Step 3: from "Card type:" select "H.264 encoder card (HD-PVR)" then "Finish"

Step 4: select "New capture card" -> "Card type:" select "H.264 encoder card (HD-PVR)" again. This time change "Video device:" to "/dev/video1" then "Finish"

Step 5: add your "Video source" and "Input connections" and follow any other instructions you have ;)


Error messages I had while trying to get the PVR-500 setup correctly:
snd_pcm_open_noupdate unknown pcm default
Error: Failed to open audio device ALSA:default
Encountered problems running /usr/bin/mythpreviewgen

Note: vlc error:
*** glibc detected *** vlc: free(): invalid pointer:
 Solution was simple for this 32bit install, as root:
mv /usr/lib/vlc/plugins/meta_engine/libtaglib_plugin.so ~/libtaglib_plugin.so-vlc-issue

Google Music Manager native Linux client install and review

To Google's credit they have quickly moved to a native Linux client with their beta Music Manager, The "google-musicmanager-beta-1.0.18.6104-0.i386" was built on September 14 and made available on September 24 2011. The initial Music Manager was built on wine like some other notable Google products (like Picasa). The Linux version of the Music Manager is now native! And since there is no bundled wine the install size is a very modest 9.5MBish.

I am running this test on CentOS 6.0(CR). Other choices for downloads is available from HERE or by going to your "ADD MUSIC" option toward the top right of the music.google.com screen after Google login. Google has downloads for Debian/Ubuntu and for Fedora/openSUSE in both 32bit and 64bit:
As root install your download. For my CentOS box I did:
yum install google-musicmanager-beta-1.0.18.6104-0.i386

 You can run the program from the command line by just typing  at your GUI prompt:
google-musicmanager

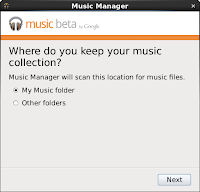
To run the Linux Google Music Manager from the Gnome desktop, just select "Applications" -> "Internet" -> "Google Music Manager". You will be greeted with this start sequence:


Here is a screenshot of the "About" for this installed version:

Here is a screenshot of the Gnome panel view of the running Music Manager:


Firefox seems well supported for Google Music when you have Flash installed:

Wednesday, October 12, 2011

CentOS 6.x Mythtv 0.24 install and setup hotwo

This is originally created with CentOS 6.0. Prior to the release of CentOS 6.1, I strongly urge all admin's to use the CentOS 6.0 CR Updates to enhance the security of your system. Also, my CentOS Mythtv server was a  "Desktop" install option for this example. I have cable TV and have used both the Hauppauge PVR-250 and now the Hauppauge PVR-500 since my needs are basic.

UPDATE: I have the PVR-500 CentOS 6 setup info with pictures for mythtv 0.24 now.

Get the security related updates first:
rpm -ihv /home/pj/Downloads/centos-release-cr-6-0.el6.centos.i686.rpm yum update

Install both EPEL and RPMFORGE repositories and please remember to also install *AND* setup either priorities or protectbase yum plugins.
rpm -ihv http://dl.atrpms.net/all/atrpms-repo-6-4.el6.i686.rpm rpm -ihv http://download.fedora.redhat.com/pub/epel/6/i386/epel-release-6-5.noarch.rpm yum install yum-plugin-priorities


Do these error messages look familiar?
 --> Processing Conflict: 1:qt47-x11-4.7.2-1_18.el6.i686 conflicts qt-x11 < 1:4.7.2-1_18.el6
--> Processing Conflict: 1:qt47-x11-4.7.2-1_18.el6.i686 conflicts qt4-x11 < 1:4.7.2-1_18.el6
--> Processing Conflict: 1:qt47-x11-4.7.2-1_18.el6.i686 conflicts phonon < 4.3.80-1
Error: qt47-x11 conflicts with qt-x11

OR
file /usr/share/man/man3/XML::SAX::Base.3pm.gz conflicts between attempted installs of perl-XML-SAX-Base-1.04-3.el6.noarch and perl-XML-SAX-0.96-7.el6.noarch
file /usr/share/man/man3/XML::SAX::Exception.3pm.gz conflicts between attempted installs of perl-XML-SAX-Base-1.04-3.el6.noarch and perl-XML-SAX-0.96-7.el6.noarch

Clean out the older/problem bits:
yum remove qt-x11 qt phonon perl-XML-SAX-Base

Install the initial problem packages:
yum install qt47 qt47-x11 qt47-webkit qt47-mysql --enablerepo=atrpms-testing


The big download and install:
yum install mythtv --enablerepo=atrpms-testing --exclude=perl-XML-SAX-Base

Make sure mysqld and mythbackend on going to try and start on boot
chkconfig mythbackend on mysqld on

You really need to read through the mythtv-HOWTO or even Installing MythTV on RHEL/CentOS

I'm migrating from CentOS 5.7 -> 6.0 following normal backup and restore steps:
service mysqld start mysql < /usr/share/doc/mythtv-docs-0.24.1/database/mc.sql


A new simple no-security-just-get-it-running setup could include:
echo 'grant all on mythconverg.* to mythtv@"%" identified by "mythtv";' |mysql mythconverg echo 'flush privileges;'|mysql mythconverg mythtv-setupp


Again, you really need to read through the mythtv-HOWTO or even Installing MythTV on RHEL/CentOS for your specific tuner card.

http://www.gossamer-threads.com/lists/atrpms/users/15601

Monday, October 10, 2011

Dell printer firmware update stupidity and howto

Not sure why Dell is taking recent steps backwards with regard to Linux support, but clearly it is. The recent BIOS update issues have given way to printer update utilities that are not Linux install friendly. The most recent example is the otherwise decent Dell 2555dn MFP. The previous A02 version of the firmware (DELL_2355DN-MONO-LASER-MFP_A02_R302331.exe) was just a self-extracting zip file. So a simple
unzip DELL_2355DN-MONO-LASER-MFP_A02_R302331.exe
would provide me with the needed "*.hd" (Dell2355dn_A02_v2.70.03.06.hd in this case) firmware file to load via the update firmware web page.
Now Dell seems to add in their install/extractor utility like the general Windows driver files have... and it takes some extra effort.

My current system/admin setup is based on CentOS 6.x but any recent distro will likely be very close. I'm going to assume that you have already downloaded the file and you are at a command/terminal prompt.

1. Install wine as root
yum install wine cabextract

2. As a normal user get winetricks and install "vcrun6"
wget http://winetricks.org/winetricks chmod +x winetricks ./winetricks vcrun6


3. As a normal user run the installer like and just exit after the GUI comes up
wine Dell2355dn_A03_2.70.03.08.exe

4. After you should be able to find the needed *.hd file in "~/.wine/drive_c/users/YOUR_USERNAME/Temp/". For this example, it was "~/.wine/drive_c/users/pj/Temp/Dell2355dn_A03_2.70.03.08.hd"

Possible error messages:
If you don't have the VBRUN 6 installed (vcrun6) you will get an error like:
err:module:import_dll Library MFC42.DLL (which is needed by L BLAHBLAH) not found
err:module:LdrInitializeThunk Main exe initialization for L BLAHBLAH failed, status c0000135

Friday, September 30, 2011

CentOS 6 lpadmin generic postscript printer addition

It really took a while for me to figure out how to add printers via the command line using lpadmin on CentOS 6. So, this information also will apply to newer Fedora users as well as RHEL 6 users:

For generic LPD/LPR Postscript print server:
lpadmin -p printer_name -m drv:///sample.drv/generic.ppd -v lpd://your_print_server/raw1 -D "Your printer description" -L "Your printer location" -o printer-error-policy=retry-job -o printer-is-shared=false -E


For generic LPD/LPR PCL print server:
lpadmin -p printer_name -m drv:///sample.drv/generpcl.ppd -v lpd://your_print_server/raw1 -D "Your printer description" -L "Your printer location" -o printer-error-policy=retry-job -o printer-is-shared=false -E

For Jetdirect/RAW print servers
lpadmin -p printer_name -m drv:///sample.drv/generic.ppd -v socket://your_print_server:9100 -D "Your printer description" -L "Your printer location" -o printer-error-policy=retry-job -o printer-is-shared=false -E

The new part is "drv:///sample.drv/generic.ppd" as the model instead of "postscript.ppd.gz" or similar from the past. This seems to trigger a ppd file build from the script/file of "/usr/share/cups/drv/sample.drv" as part of the cups package.

Notes:
I don't like the default option of not retrying failed jobs. It's a dumb default IMHO! The "-o printer-error-policy=retry-job" is a better choice.

I also tend to turn off sharing as a general rule. You may want it on, however. The "-o printer-is-shared=false" turns off printer sharing.

The Jetdirect/RAW printer socket can change for print servers with multiple ports. First port is 9100, second is 9101 etc. The same kinda process exists for the LPD/LPR print server where "raw1" will increment for printer port as a generic rule.

Saturday, September 17, 2011

CentOS 6.0 Zimbra 7.1.2 Open Source Edition misc setup notes

This not a formal information page... it is a free form of helpful Zimbra bits of information that I needed in order setup a Zimbra server. This Zimbra setup has a seperate openldap server as the authentication server. The ldap specific stuff has been removed. We were moving from a VERY distributed mail setup. Each of the 40 plus remote sites is a mail destination, each with it's own mail server (postfix) and IMAP (dovecot) setup.

#to set env variables needed by zimbra provided services
. ~/bin/zmshutil ; zmsetvars

#sets zimbra to listen in https mode restart of zimbra needed (as zimbra)
zmtlsctl https

#set max upload imap size to 30MB (as zimbra)
zmprov mcf zimbraFileUploadMaxSize 30000000

#to get the zimbraID COS "class of service" (as zimbra)
zmprov gc Default |grep zimbraId:

#this will let all your users login with just the first part of their e-mail address (as zimbra)
zmprov mcf zimbraDefaultDomainName YOURDOMAIN.WHATEVER

#set up bulk add from host with authentication connection for users
getent passwd | egrep -v "thing1|thing2|:x:|:\*:" | sort -t : -k 3g,3 > /tmp/ldapinfo.txt perl zimbra-passwd2zmprov.pl -domain YOURDOMAIN.WHATEVER -password ZIMBRA_PASSWORD < /tmp/ldapinfo.txt > ldapinfo.zmp

#if you still need to route most users through another server until migration (as zimbra)
cat ldapinfo.zmp |perl -e 'while (<>) { chop;print ($_," zimbraMailTransport smtp:MAIL.YOURDOMAIN.WHATEVER:25\n"); }' > ldapinfo1.zmp zmprov < ldapinfo1.zmp

#increase the number of threads for lmtp, imap, http(s) etc (as zimbra) from http://wiki.zimbra.com/wiki/Performance_Tuning_Guidelines_for_Large_Deployments
zmprov ms `zmhostname` zimbraHttpNumThreads 500
zmprov ms `zmhostname` zimbraImapNumThreads 500
zmprov ms `zmhostname` zimbraLmtpNumThreads 50
zmprov ms `zmhostname` zimbraMessageCacheSize 10000 zmlocalconfig -e mailboxd_java_heap_size=9830 #20% of system ram - system ram = 48GB for this example zmlocalconfig -e zimbra_require_interprocess_security=0

#for users moving to Zimbra server that had other mail destinations
zmprov ma "YOURUSER@YOURDOMAIN.WHATEVER" zimbraMailHost ZIMBRA.YOURDOMAIN.WHATEVER zmprov ma "YOURUSER@YOURDOMAIN.WHATEVER" zimbraMailTransport lmtp:ZIMBRA.YOURDOMAIN.WHATEVER:7025

#added next 3 lines to /etc/sysctl.conf based on info from zimbra http://wiki.zimbra.com/wiki/Performance_Tuning_Guidelines_for_Large_Deployments
net.ipv4.tcp_fin_timeout=15 net.ipv4.tcp_tw_reuse=1 net.ipv4.tcp_tw_recycle=1
#also modified /opt/zimbra/conf/my.cnf after memory addition to server
innodb_buffer_pool_size innodb_max_dirty_pages_pct

#/opt/zimbra/mysql/bin/mysqlcheck errors:
mysql.general_log Error : You can't use locks with log tables. mysql.slow_log Error : You can't use locks with log tables.
fix with:
mv /cassens/zimbra/db/data/mysql/*_log.frm /tmp/ /etc/init.d/zimbra restart

#mount zimbra filesystem with "noatime" option

#web pages or external info:
http://wiki.zimbra.com/wiki/Split_Domain
http://wiki.zimbra.com/wiki/Mysql_Crash_Recovery
http://wiki.dovecot.org/Authentication/MasterUsers
http://wiki.zimbra.com/wiki/Zmprov_Examples
http://www.zimbra.com/docs/ne/latest/administration_guide/wwhelp/wwhimpl/js/html/wwhelp.htm#href=ZCS_Admin_Guide_7_NE.Managing_Resources.html
http://www.zimbra.com/docs/ne/latest/administration_guide/wwhelp/wwhimpl/js/html/wwhelp.htm#href=ZCS_Admin_Guide_7_NE.VMware_Zimbra_Collaboration_Server.html
http://wiki.zimbra.com/index.php
http://wiki.zimbra.com/wiki/Performance_Tuning_Guidelines_for_Large_Deployments
http://wiki.zimbra.com/wiki/Open_Source_Edition_Backup_Procedure
http://wiki.zimbra.com/wiki/Moving_ZCS_to_New_Server
http://wiki.zimbra.com/wiki/Guide_to_imapsync

Thursday, August 25, 2011

How to set or reset a Dell Service Tag

Kinda bummed about having to do this on my own, but it just seemed easier. I have a Dell PowerEdge R710 that DID NOT handle either a iDrac or BIOS version update very well. The BIOS would not show a version number and the iDRAC6 would just hang. Couldn't reset the iDRAC and could barely get the box running again (had to pull power and do a dance and hope for it to boot). Most of the time the iDRAC boot option would get auto selected... long story. None of the 2 days of work requested by Dell tech's helped... they had to replace both the motherboard and iDRAC6 card. (on a side note, I may post on the large number of ways to flash firmware or BIOS's that Dell has provided to Linux users)

Sadly, the "asset" program the tech had with him seemed to only set the "Asset Tag" and not the Service Tag. The BIOS was the only thing that would show the Service Tag correctly. None of the normal ways to get the ST would produce results:
dmidecode -s system-serial-number racadm getsvctag getSystemId
I did find a DOS asset.exe executable, but who wants to boot a server system to DOS?! There was the lonesysadmin.net peeps with a plausible boot .iso... nah, there's gotta be a better way without having to resort to that... More google'n and bingo the hint I needed.

Turns out that the OMSA install I had could do what I wanted. I just didn't know it. At least for CentOS 6.0 and with smbios-utils-python-2.2.26-6.1.el6.x86_64 on a Dell R710 with BIOS 3.0.0, I can run:
smbios-sys-info --service-tag --set=123456
and this will set/reset my newly replaced motherboard to have the Service Tag I need! Please note that this Service Tag also persists over reboots unlike some older posts seem to have issues with.

As always, YMMV